|
The Summary tab shows information
about the supplier, the type of task, task start date and the last date
the status changed. You may also view any options assigned to the task
and any checklist items that should be completed with the task. Options
include anything from carpet type to appliances. Checklist items could
be inspection items that need to be completed before the task is complete.
|

|
The Summary tab shows different
fields depending on your user role, your company modules, and the status
of the task. |
Perform the following
actions on this page:
To start a task (scheduled
tasks only):
In the Request
Date field, edit the date you need this item delivered, if necessary. Click the button next
to the appropriate Back Order Policy
option. Enter any relevant notes
in the Instructions to Supplier field. If necessary, click
the Schedule Change Reason and
Schedule Change Supplier fields
and make the appropriate selections. Click the Submit
Order button.
To skip a task (scheduled tasks only):
On a scheduled task,
click the Skip Task button. The
task status changes to skipped. To undo the task skip,
click the Undo Skip Task button.
The task status changes back to scheduled. The Undo Skip Task button is
visible until the task is exported to the back-office.
To complete a task (in-progress tasks only):
Click the Mark
the Order Received/Complete check box. Or, if this order has exceptions,
click Mark Exceptions on this Task/Order. If task is an EPO and
it is not ready to be submitted for approval, click the EPO
Not Ready button. If necessary, click
the appropriate option to update the Checklist
Items status. Click the Complete
Task button. If the task is an MPO,
the MPO pop-up window opens so you can enter the MPO
Quantity. Click the Receive Qtys
button. The task status changes to complete. If the task is an NTE EPO, the NTE EPO pop-up window
opens so you can enter the Actual Amount.
Click the Update button. The task
status changes to complete. To undo the task completion,
click the Undo Complete Task button.
The task status changes back to scheduled. The Undo Complete Task button
is visible until the task is exported to the back-office.
To edit an EPO (scheduled EPOs that are marked not ready):
Under the Reconciled
field, click the Edit EPO link.
The EPO Edit - Details and
Items page opens. Edit the EPO Task Detail
as necessary. Click the Update
button at the bottom of the page to save your changes. The page returns
to the Job Task page.
To resubmit a declined EPO (scheduled
EPOs only):
Under the Reconciled
field, click the Edit and Re-Submit for
Approval link. The EPO
Edit - Details and Items page opens. Edit the EPO Task Detail
as necessary. Click the Re-submit
EPO button to resubmit the EPO for approval.
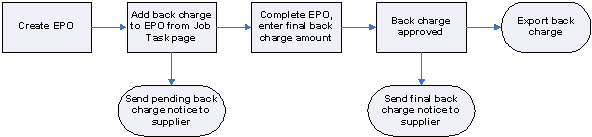
To add a back charge to an EPO task (all EPO task statuses except cancelled):
Under Job Options,
click the Create Back Charge for this
EPO link. The Back Charge pop-up window opens. Click on the Select
link in the Supplier(s) to Back Charge
column. The link turns into a drop-down list. Choose a Supplier
from the drop-down list. Enter a
% Percentage or $
Dollar Amount. This is the percentage or dollar amount that the
selected supplier will be back charged. The back charge amount cannot
exceed the EPO amount.
|
|
Usually, it’s best
to enter a percentage, like 100%, which would charge the supplier for
100% of the EPO amount. This way, if the EPO amount changes, the back
charge amount will be automatically updated. |
Enter a Back
Charge Description and Notes. Click the Add Back
Charge button. The pop-up window closes. A Pending Back Charge
Notification is sent to the assigned supplier by fax/email. Also, a Pending
Back Charge Alert is generated in SupplyPro.
To edit or delete a back charge on an EPO
task (all EPO task statuses except
cancelled):
Under Job Options,
click on the Edit Back Charge for this
EPO link. The Back Charge pop-up window opens. Edit the Back Charge
Information as necessary. Click the on Update
Back Charge button. Or, to delete the back charge from this EPO, click the
Delete Back Charge button.
To transmit an EPO work authorization notice
to the supplier (all EPO task statuses
except cancelled):
Next to the Supplier
field at the top of the page, click on the Transmit
WA button. The EPO work authorization is sent to the supplier via
fax/email.
|
|
This document authorizes
the supplier to proceed with the EPO work. The purchase order will be
sent to the supplier when the task is started. |
Click the Print
WA button to open a printable version of the EPO work authorization
in a separate window. You can then print the page. On the
Job Task page, click on the Cancel WA
to send a cancellation notice to the supplier. This document notifies
the supplier that the work authorization has been cancelled. The EPO may
still be active, but the supplier is not authorized to begin work yet.
|
|
The Cancel
WA button appears after you transmit the EPO work authorization. |

|